Introduction to EZGo Golf Cart Maintenance
Maintaining your EZGo golf cart is crucial for ensuring its longevity and optimal performance. Regular tune-ups not only enhance the efficiency of your golf cart but also prevent future mechanical issues. This guide will provide you with essential maintenance tips and a step-by-step approach to tuning up your EZGo golf cart, whether you own a TXT, RXV, or any other model.
Understanding the basics of how to tune up an EZGo golf cart is the first step toward effective maintenance. It involves routine checks and replacements of critical components like fuel filters, air filters, oil filters, and spark plugs. These components are pivotal in keeping your golf cart running smoothly and efficiently.
For those who prefer a hands-on approach, a DIY EZGo golf cart tune-up can be both a rewarding and cost-effective solution. With the right tune-up kits and a bit of guidance, you can perform most of the maintenance tasks yourself. This not only saves money but also gives you a deeper understanding of your vehicle’s mechanics.
However, it’s important to recognize when professional help is needed, especially when dealing with complex golf cart engine tuning or troubleshooting post-tune-up issues. Regular EZGo golf cart upkeep can significantly reduce the need for professional repairs, ensuring that your golf cart remains a reliable and enjoyable mode of transportation for years to come.
In the following sections, we’ll delve into the specifics of each maintenance task, providing you with a comprehensive EZGo golf cart tune-up guide to help you keep your golf cart in top condition.
Key Takeaways
- Regular Maintenance is Crucial: Consistent tune-ups are essential for the longevity, efficiency, and safety of your EZGo golf cart.
- Key Components to Check: During a tune-up, focus on the fuel filter, air filter, oil filter, and spark plug. These are critical for smooth operation.
- DIY Tune-Up Possibility: Many maintenance tasks can be performed DIY with basic mechanical knowledge and the right tools, though professional help may be needed for complex issues.
- Frequency of Tune-Ups: Typically, a yearly tune-up is recommended, but more frequent maintenance may be necessary for heavily used or environmentally stressed carts.
- Common Post-Tune-Up Issues: Be aware of issues like the golf cart not starting, making unusual noises, or experiencing reduced power, often due to improper installation or loose connections.
- Cost-Effectiveness of DIY: DIY tune-ups can save money on labor costs, but it’s important to ensure you have the correct tools and parts.
- Long-Term Benefits: Regular maintenance prevents major breakdowns, extends the lifespan of the golf cart, maintains its value, and ensures efficient operation.
- Professional Help When Needed: For complex issues or specific model requirements, professional servicing is advisable to maintain reliability and value.
Essential Tools and Kits To Tune Up An EZGo Golf Cart
Proper maintenance of your EZGo golf cart requires the right set of tools and a suitable tune-up kit. Whether you’re a seasoned golf cart owner or new to the world of golf cart maintenance, understanding what to include in your toolkit is key to a successful tune-up.
Selecting the Right Tune-Up Kit
The heart of any good maintenance routine is the tune-up kit. For EZGo golf carts, especially popular models like the EZGo RXV & TXT, specific kits are available that cater to their unique requirements. A standard kit typically includes spark plug maintenance items, air filter maintenance components, and fuel filter replacements. Choosing the best tune-up kits for your specific model ensures that all parts are compatible and effective.
Additional Tools for Maintenance
In addition to the tune-up kit, having a set of basic tools can make the maintenance process smoother. This includes wrenches, screwdrivers, and pliers. For more advanced tasks like golf cart engine tuning or oil filter changes, specialized tools may be required. It’s always a good idea to have a comprehensive golf cart tune-up checklist at hand to ensure you have all the necessary tools and parts before starting your maintenance work.
By equipping yourself with the right tools and a quality tune-up kit, you’re well on your way to enhancing the performance and extending the life of your EZGo golf cart. In the next section, we’ll guide you through a step-by-step process of tuning up your EZGo golf cart, ensuring you cover all the essential maintenance tasks.
Step-by-Step Guide to Tuning Up Your EZGo Golf Cart
A thorough tune-up of your EZGo golf cart is essential for optimal performance and longevity. This section provides a detailed walkthrough of the key steps involved in the tune-up process, ensuring your golf cart runs smoothly and efficiently.
Step 1: Checking and Replacing the Fuel Filter
Begin your tune-up by inspecting the fuel filter. A clogged or dirty fuel filter can lead to engine problems and reduced efficiency. If you notice any blockage or wear, replace it with a new one. This simple step is a crucial part of EZGo golf cart maintenance and can significantly impact the performance of your cart.
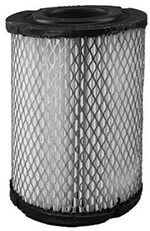
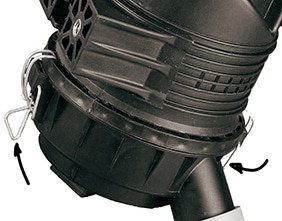
1976-1994 Marathon 2-Cycle
The canister air filter is accessed by raising and lifting out the cart seat, locating the cylindrically shaped airbox with a cap on the end, and unsnapping the two holding clips on each side. Remove the lid and then the filter. Inspect the filter for oil and dust, and if it is only lightly dusty, use compressed air to blast as much of the soil out of the filter as possible. If it is too dirty and/or oily replace it with a new one. Reinstallation is the reverse of these steps.
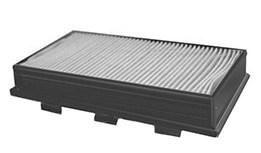
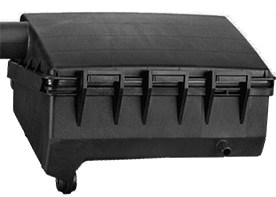
1991-1994.5 Marathon 4-cycle
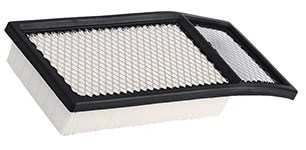
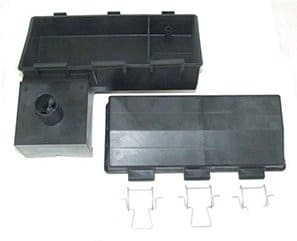
The filter for this model is rectangular and is accessed by unsnapping the spring clips and swinging the cover open. Remove the filter and inspect. If it is not oily, and only lightly dust-covered, you can blow the dust off with compressed air. If the filter is too cruddy, replace with a brand new filter.
1994 – 2005 Medalist / TXT 4-cycle 295cc / 350cc
The filter for this model is rectangular and is accessed by unsnapping the spring clips and swinging the cover open. Remove the filter and inspect. If it is not oily and lightly dust-covered, you can blow the dust off with compressed air. If the filter is too cruddy, replace with a brand new filter.
Step2: Changing the Oil Filter and Spark Plug
The oil filter and spark plug are also vital components that need attention during a tune-up. Change the oil filter to ensure clean oil circulates through the engine, reducing wear and tear. Similarly, inspect the spark plug and replace it if necessary. Proper spark plug maintenance ensures efficient fuel combustion, which is essential for the smooth operation of your golf cart.
By following these steps, you can perform a comprehensive tune-up of your EZGo golf cart, ensuring it remains reliable and efficient. In the upcoming sections, we’ll explore DIY tips for golf cart maintenance and how to troubleshoot common issues after a tune-up.
Oil Filter Replacement
Changing the oil filter on an E-Z-GO golf cart is a fairly simple process. Here’s a basic step-by-step guide:
- Prepare Your Work Area: Make sure your golf cart is on a flat, level surface. You may want to place a container or some sort of catch basin under the oil filter to catch any oil that may spill out when you remove it.
- Remove the Old Oil Filter: Using an oil filter wrench, turn the filter counterclockwise to loosen it. Once it’s loose, you should be able to unscrew it by hand. Be careful, as the filter will still have oil in it.
- Prepare the New Oil Filter: Before installing the new oil filter, apply a small amount of fresh oil to the rubber gasket on the top of the new filter. This will help create a better seal and make it easier to remove the next time you change the oil.
- Install the New Oil Filter: Screw the new filter into place by hand. Then, use your oil filter wrench to tighten it. Do not overtighten the filter, as this can cause the gasket to break.
- Check for Leaks: Once the new filter is installed, start the engine and let it run for a few minutes. Check around the oil filter for any leaks. If you notice any, turn off the engine and tighten the filter a little more.
- Dispose of the Old Oil Filter: Take the old oil filter to a recycling center or auto parts store that accepts used oil filters. Be sure to dispose of it properly, as it is considered hazardous waste.
Remember, it’s always a good idea to refer to your golf cart’s owner’s manual for specific instructions related to your specific model.
Spark Plug Replacement
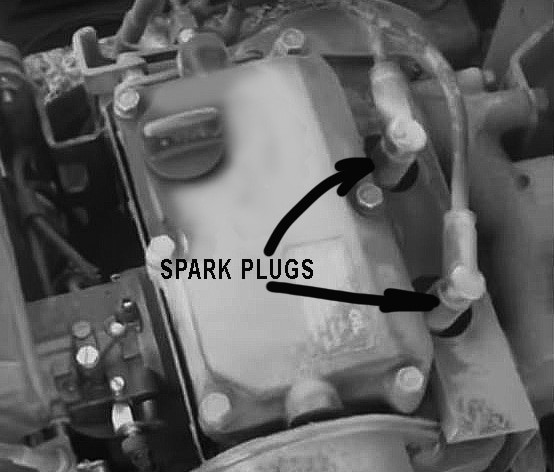
The recommended spark plugs are manufactured by NGK, number NGK BPR4ES. Locate the spark plug(s) on the top of the engine and remove the cable, exposing the top of the plug. Use a spark plug socket and ratchet to remove the spark plug and inspect the ceramic insulator.
The ceramic insulator should be ivory colored, light brown to brown would indicate the fuel mixture is too lean. If it is black in color, you might be running too rich of a fuel mixture, requiring an adjustment to the air/fuel mixture screw.

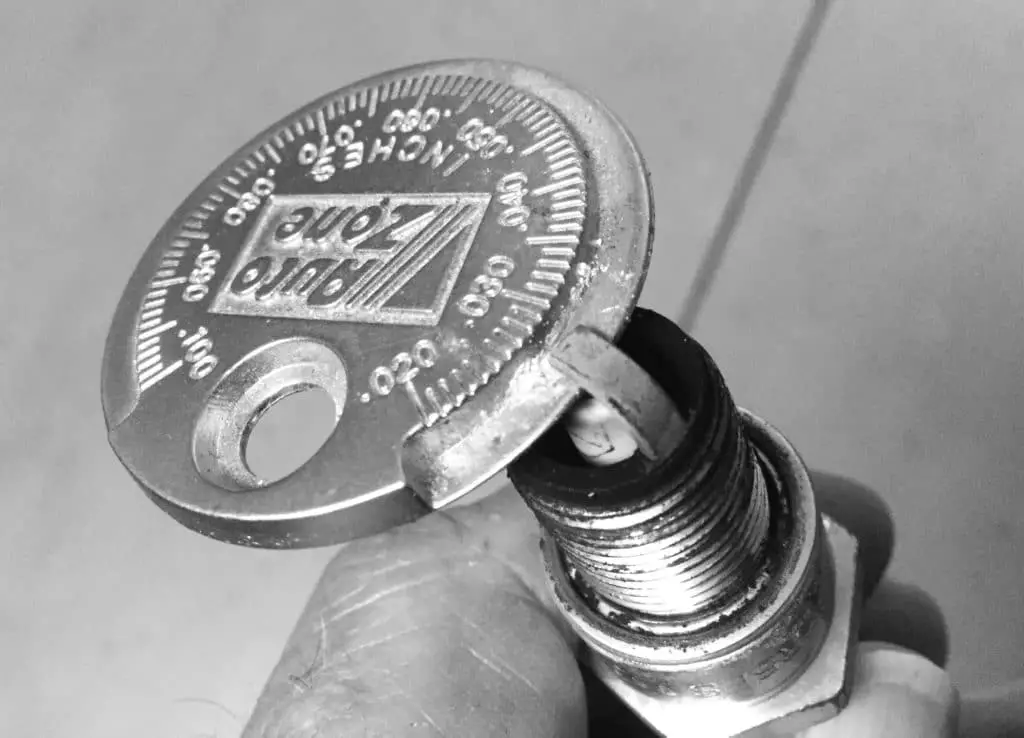
Check the gap with a spark plug gap tool (cheap or free at most parts counters) and set this gap to .028 – .030.
Replace the spark plug and screw into place using the socket and your fingers to prevent cross-threading. Lightly tighten with the ratchet…no need to strip it out by tightening too much. Push the wire connector back on to the spark plug. Inspect the connector boot and wire for any cracking or damage and replace if needed.
Step 3: Fuel
The fuel filter is located in line between the fuel tank and the fuel pump. If the housing is clear plastic, make sure that the fuel inside is not dark amber or discolored from age. To remove the filter, disconnect the hose from the fuel pump by using a pair of pliers to squeeze the clamp ends together and sliding the expanded clamp further down the line. Raise the hose up and allow any excess fuel to drain back into the fuel tank. Put the hose back in place on the pump and secure the clamp with pliers again.
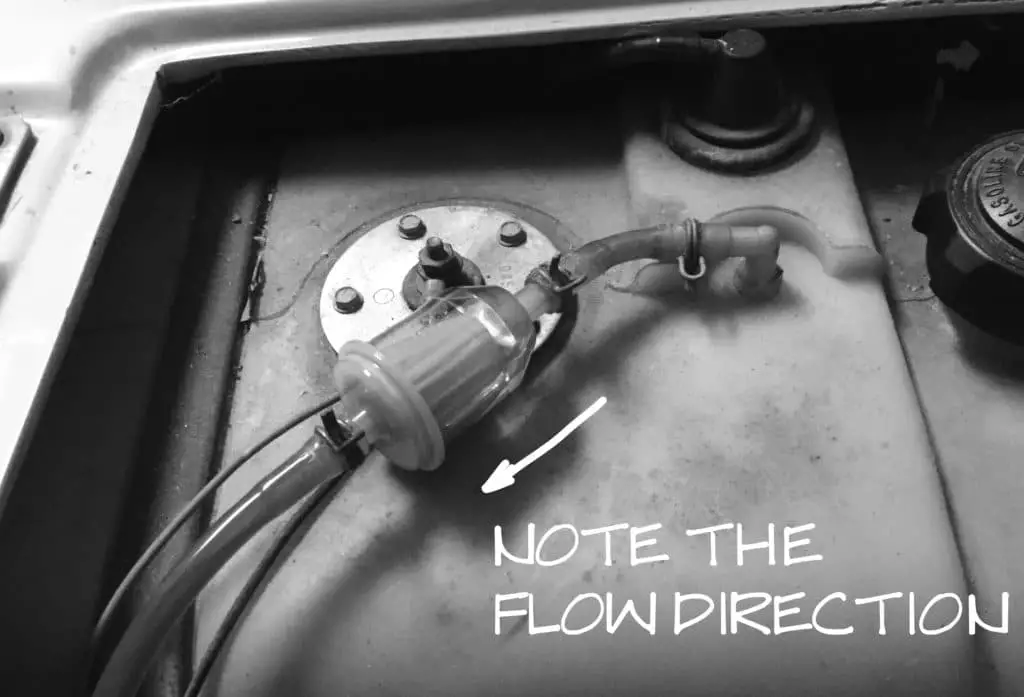
Now remove the hoses from both ends of the filter, keeping a mental note of the orientation of the filter body, or take a picture with a cell phone…we don’t want to put this on backward. Tap the inlet side of the filter (the tapered end) on a paper towel-lined surface and see if any contaminants are dislodged and stain the paper towel. Your judgment will be needed here to decide if you need to replace the filter or not.
Return the filter to the gas line and secure it with the clamps. Sometimes there is a second filter located underneath the carburetor facing the front of the cart. Check to see if you have one and make sure it is also clear of deposits.
Air/Fuel mixture adjustment
2 Cycle engine: The adjustment screw is on the side of the carburetor and is parallel to the ground. You can identify it by the lock nut at the base of the screw. Loosen this and turn the screw all the way into a soft seat, then back it out one and a half (1-1/2) turns.
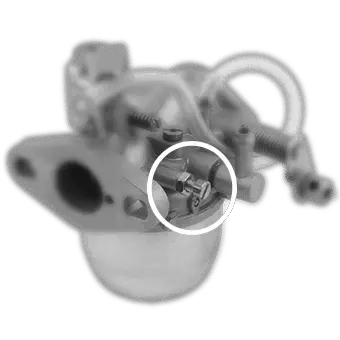
There is a lot of discussion about the best setting for this, and on several blog pages, they suggest removing the drive belt first, then backing out the fuel adjustment screw while the engine is running. Once the engine is running at it’s best, the lock screw is tightened down, the engine is shut off, and the drive belt is replaced.
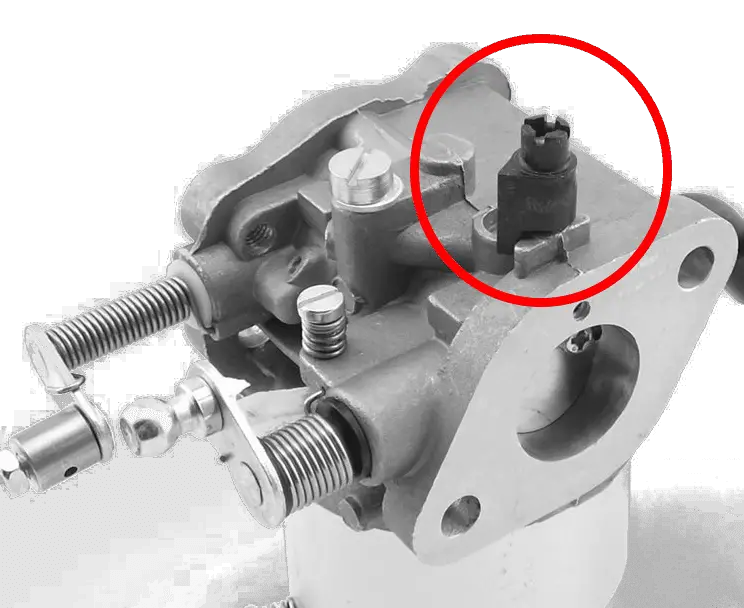
4 cycle engine: This has a plastic cap limiter on the top of the carburetor, and there is a minimal amount of adjustment needed or available with this model.
Step 4: Valve Adjustment
Check and adjust the valves every 250 hours or every year To keep the engine starting and running properly.
For the 295cc or a 350cc twin-cylinder OHC engine. 1991 – Present
NOTE: THIS PROCEDURE IS DONE WITH THE ENGINE COLD
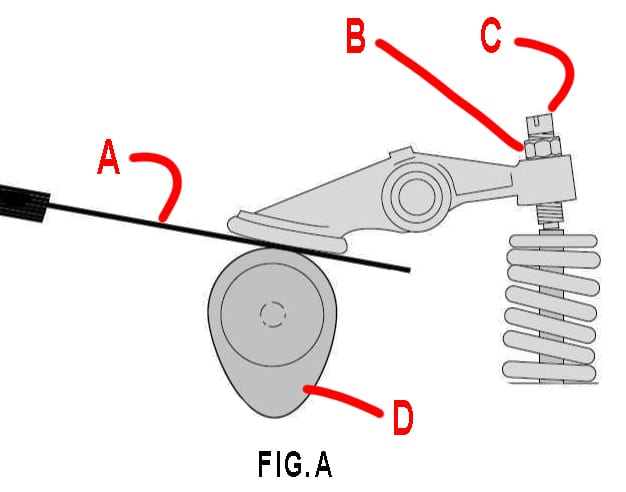
Tools required: Ratchet with 6″ extension, 10mm socket, 10mm socket wrench, flat blade screwdriver, and a feeler gauge. Note: if the screw (C) has a square head instead of a flat blade slot, this takes a tool designed just for this purpose. You can, however, get around this by taking an old pair of pliers and grinding a V-shaped groove length-wise in the jaws (< >).
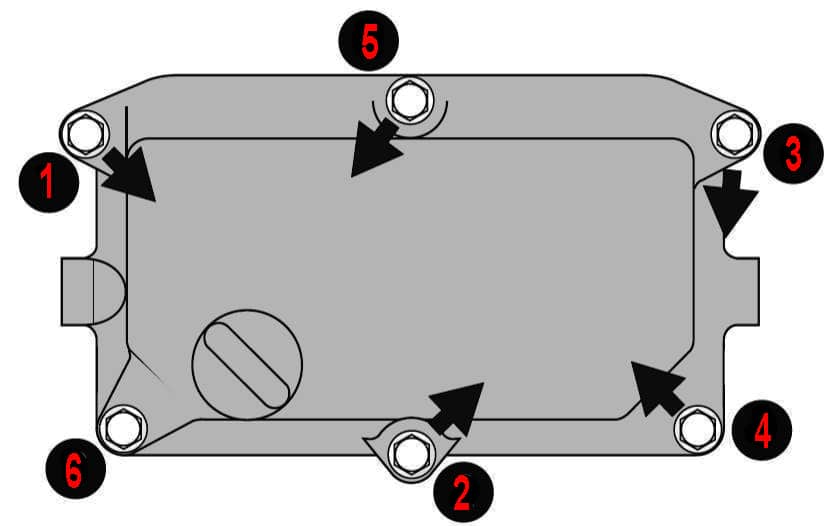
Remove the valve cover bolts in the pattern shown using a 10mm socket wrench and carefully pry off the cover, retaining the six spacer sleeves and the gasket. Set these aside and inspect the rocker arm assembly. Turn the engine by hand to point the cam lobe (D) down on the first rocker you are checking.
With the cam lobe (D) down, use a .004 feeler guage (A) and slide it between the lobe and the rocker arm as shown. If there is no resistance or too much resistence, loosen the lock nut (B) and adjust the set screw (C) until there is a slight drag sliding the guage in or out of the gap. Hold the set screw in place while tightening the lock nut. Recheck with the feeler guage.
For the Kawasaki FJ400 401cc 4-cycle Single Cylinder 1996 – Present
NOTE: THIS PROCEDURE IS DONE WITH THE ENGINE COLD
Tools required: Ratchet with 6″ extension, 10mm socket, 3mm hex wrench, feeler gauge.
Remove the four bolts (B) and carefully pry the cover (A) off, ensuring the rubber gasket does not stick and tear against the engine head. Inspect the gasket and wipe clean before putting the cover back on after the adjustment.
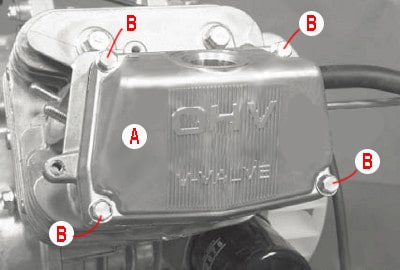
There will be two rocker arms to check. Turn the engine crank pulley by hand until the compression stroke is at top dead center. Insert a .004 feeler gauge (E) as shown between the tappet (D) and the valve stem. There should be a slight drag when you slide the gauge back and forth, and if the clearance is too high, you need to adjust it in. If you cannot get the gauge to slide in, then you don’t have enough clearance.
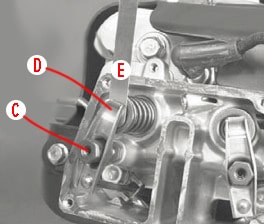
To adjust this clearance, use the 3mm hex wrench to loosen the center locking screw (C) and turn the surrounding 14mm nut with the wrench to open or close the gap. When the clearance is such that the feeler gauge begins to drag between the rocker and the valve, use the 3mm hex wrench to lock it back down while holding the 14mm nut in place with the wrench. Tighten to a torque of about 5 ft/lbs. DO NOT OVERTIGHTEN!
DIY Tips for EZGo Golf Cart Maintenance
Maintaining your EZGo golf cart doesn’t always require professional help. With some basic knowledge and the right tools, you can perform most maintenance tasks yourself. This section provides practical DIY tips to keep your golf cart in top shape.
Easy Maintenance Procedures You Can Do at Home
Many aspects of EZGo golf cart upkeep can be managed at home. Regularly checking and cleaning the battery terminals to prevent corrosion, inspecting tire pressure and tread, and ensuring all electrical connections are secure are simple yet effective practices. These tasks not only prolong the life of your golf cart but also enhance its performance.
Troubleshooting Common Issues After Tune-Up
Even after a thorough tune-up, you might encounter some issues. Common problems include the golf cart not starting, unusual noises, or reduced power. For EZGo golf cart troubleshooting, start by checking the most recent parts you’ve worked on during the tune-up. Ensure that all connections are secure and that no components are improperly installed. Often, simple checks and adjustments can resolve these issues without the need for professional intervention.
By embracing these DIY maintenance tips, you can ensure that your EZGo golf cart remains a reliable and efficient mode of transportation. In the next section, we’ll delve into advanced tips for enhancing the performance of your EZGo golf cart and when it’s advisable to seek professional help.
Enhancing the Performance of Your EZGo Golf Cart
After completing the basic tune-up, there are additional steps you can take to further enhance the performance of your EZGo golf cart. This section covers advanced tips for those looking to get the most out of their vehicle.
Advanced Tips for Performance Enhancement
Performance enhancement for your EZGo golf cart can range from simple tweaks to more complex upgrades. Consider upgrading to a higher capacity battery for extended range, or installing custom tires for better traction and stability. For those with a bit more technical know-how, adjusting the governor for increased speed or upgrading the motor can offer significant performance boosts. Remember, while these enhancements can improve your golf cart’s capabilities, they should be done in accordance with safety standards and local regulations.
When to Seek Professional Help
While many maintenance and enhancement tasks can be DIY, there are times when it’s best to seek professional help. Complex electrical issues, motor repairs, or any problems beyond your comfort and knowledge level should be handled by a professional. This ensures that your golf cart is serviced correctly and safely, maintaining its reliability and value. Professional technicians can also provide valuable advice on performance upgrades and long-term maintenance strategies.
By following these tips and knowing when to seek professional assistance, you can ensure that your EZGo golf cart operates at its best. In the final sections, we’ll explore the cost analysis of EZGo golf cart tune-up and conclude with key maintenance tips for ensuring the longevity and efficiency of your golf cart.
Cost Analysis of EZGo Golf Cart Tune-Up
Understanding the costs involved in tuning up your EZGo golf cart is important for effective budgeting and decision-making. This section provides an overview of the expenses associated with both DIY and professional tune-ups.
DIY vs Professional Tune-Up Costs
Performing a tune-up yourself can be more cost-effective than hiring a professional. The primary expenses in a DIY tune-up include the cost of the tune-up kit and any additional tools or parts needed. On the other hand, professional tune-ups, while more expensive, offer the expertise and assurance that everything is done correctly. They can be particularly valuable for more complex tasks like golf cart engine tuning or when dealing with specific models like the EZGo RXV & TXT.
Long-Term Benefits of Regular Maintenance
Investing in regular maintenance, whether DIY or professional, can save you money in the long run. Regular tune-ups help prevent major breakdowns, extend the lifespan of your golf cart, and ensure it operates efficiently. This not only saves on repair costs but also maintains the value of your golf cart.
In conclusion, whether you choose to perform maintenance tasks yourself or hire a professional, regular tune-ups are essential for the longevity and efficiency of your EZGo golf cart. In the next section, we’ll wrap up with a summary of key maintenance tips and final thoughts on caring for your EZGo golf cart.
FAQs: Tuning Up Your EZGo Golf Cart
What are the essential components to check during an EZGo golf cart tune-up?
Key components to check and possibly replace during a tune-up include the fuel filter, air filter, oil filter, and spark plug. Regular inspection and maintenance of these parts are crucial for the smooth operation of your golf cart.
Can I perform an EZGo golf cart tune-up myself?
Yes, many aspects of EZGo golf cart maintenance can be done DIY, especially if you have a basic understanding of vehicle mechanics and the right tools. However, for more complex issues or specific model requirements, professional assistance might be beneficial.
How often should I tune up my EZGo golf cart?
The frequency of tune-ups depends on how often you use your golf cart and under what conditions. Generally, a yearly tune-up is recommended, but more frequent maintenance may be necessary for carts used heavily or in demanding environments.
What are some common issues after tuning up an EZGo golf cart?
Common issues post-tune-up include the golf cart not starting, unusual noises, or a decrease in power. These problems are often due to loose connections or improper installation of new components. A thorough check of the work done can usually identify and rectify these issues.
Is it cost-effective to do a DIY tune-up on an EZGo golf cart?
DIY tune-ups can be more cost-effective than professional services, as you only need to pay for the parts and not the labor. However, ensure you have the right tools and knowledge to perform the tune-up correctly to avoid any potential issues.
Owning an E-Z-Go gas golf cart can be a great experience if the gas engine is maintained and serviced correctly. Searching through forums and YouTube videos can get tedious, so I have gathered these tips together and run them by an experienced cart technician.




Leave a Reply