For those golf cart owners that own an electric cart, it’s important that the batteries be kept charged and ready to go. sometimes however the car doesn’t charge or doesn’t last very long. is it the batteries or could it be the charger?
How to test a golf cart battery charger? Assure that the golf cart battery charger is actually running and that you have voltage at the battery charger plug by using a multimeter or voltage tester. Let’s go over some of the simple basics and get that battery charger operating the way it should.
Step 1. Determine if the battery charger is at fault.
Did you know that most modern battery chargers will not even begin to charge batteries if the batteries original charge is not high enough? The automatic battery charger needs a minimal amount of voltage in the batteries to even begin working, say somewhere around 20 to 35 volts total.
It would be easy to say “Oh, just try it on another golf cart and see if it works.” Well, most of us don’t have access to another golf cart, let alone one that the battery charger would be compatible with. So, let’s try another step to see if we can eliminate the golf cart as the problem.
Step 2. Test the Batteries.
Take your voltage tester and measure the output voltage of all the batteries together. See if they measure the voltage required to actuate your charger (If you have the manual for your battery charger, the minimum voltage should be listed there.) if the batteries do not equal the minimum voltage and above, then you’ve found the problem. What do you do at this point?
Step 3. Charge the batteries individually.
If the batteries are too low, charge them individually with a regular old car battery charger, usually the12-volt variety.
- 2-in-1 Device: Combines a battery charger, and maintainer into a single unit
- Powerful Charging: The Schumacher Electric SC1282 Fully Automatic Battery Charger and Maintainer delivers 10-amp charge …
- Fully Automatic: Controlled by internal microprocessor, the SC1282 features multi-stage charging, bad battery detection …

You can either charge them to full capacity or just high enough to meet the minimum voltage required. If your cart has 12-volt batteries, this is going to be an easy procedure, but if you have 8-volt batteries, you have two choices.
1. You can use the 12-volt setting but connect a 4.5-ohm 10-watt resistor in series with the charger. This will limit the current when fully charged to about an amp.
2. The other method would be to set your automotive battery charger to a 6-volt setting and charge the individual battery for an hour and see if it reaches 7.8 to 7.9 volts. This will be a sufficient voltage for each battery to collectively kick on the golf cart battery charger.
Step 4. The battery charger is the culprit…now what?
Manual Charger Symptom: Charger Doesn’t Turn On.
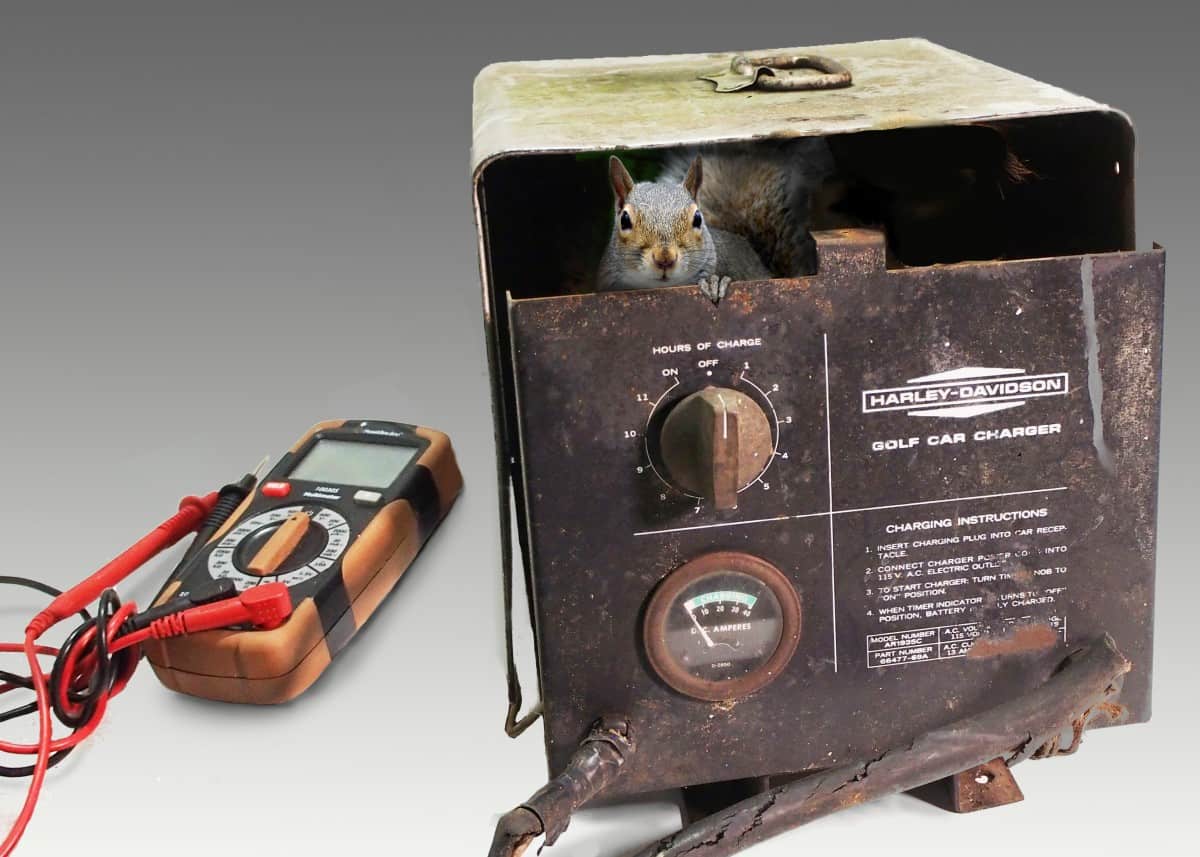
On a manual battery charger, you will have a timer dial to turn. The timer allows you to set the number of hours your batteries will charge before switching off the charger.
Step 5. Listen to the battery charger.
With the battery charger plugged in turn the dial on and see if you even get a hum or any reaction from the relay, such as a click followed by a hum. If not, check the fuse on the charger ( I know, I know, but you would be surprised how many times this is the issue.) If the fuse is blown and replacing it with a new one only results and it blowing again, it is likely a shorted diode inside the case.
Step 6. Check output voltage… how do you test a golf cart battery charger with a multimeter?
No relay clicking noise followed by a hum or slight vibration to the case is a good indication that the battery charger is not getting power, so before we open the case up, let’s test the voltage at the charger plug. With the battery charger off, set the multimeter to measure voltage and hook it up to the output contacts on the plug, then turn the timer knob to “on”. If no voltage is present then it is time to try one more thing.
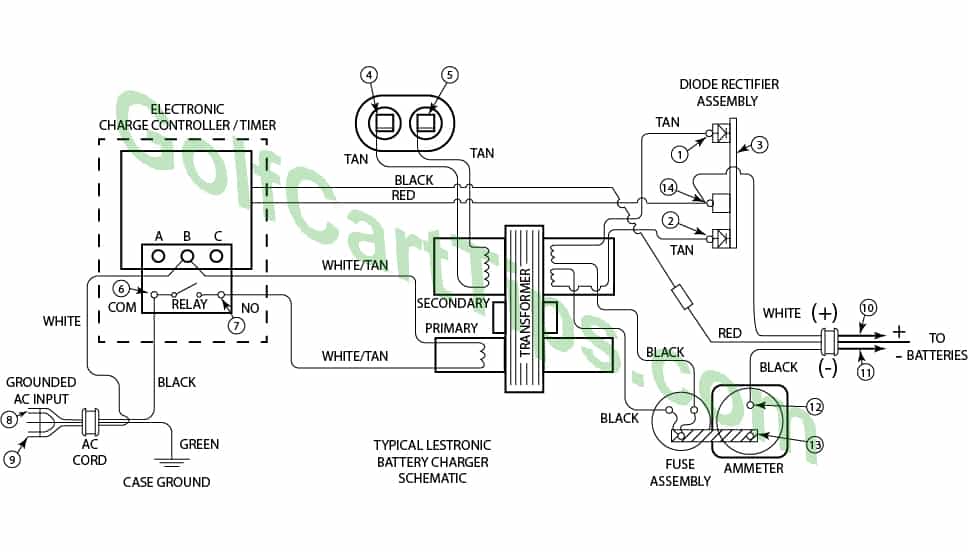
Unplug the charger and connect continuity tester leads to both blades of the power cord (8 and 9) and then twist the timer know to “on”. There should be continuity at this point.
Step 7. Continuity test the battery charger output plug.
Your continuity tester can be hooked up to the output plug positive to positive (10) and negative to negative (11) and there should be at least some continuity maybe with resistance. Swapping the tester leads should get no continuity at all. If one or both of these tests fail, it means you might have a shorted or faulty diode.
Step 8. Open the case.
Once you have access to all the components inside, first use the continuity setting on your multimeter and check the timer switch. Besides the fuse, this is the most common failure point on a charger. If your charger has an automatic timer, then there will not be a twist type knob on the front.
Attach the leads to both contacts (6 and 7) and twist the dial. there should be continuity at this point. if the meter reads that there is no continuity then you have a bad timer switch.
The next step is to measure the continuity between the end of the charger contact (10 or 11) and the termination Point inside the case (12 or 14). Check both the positive and the negative as well as the ground and if these check out, then start testing the connections between the components on the front of the battery charger. Check continuity across the meter and the connections leading to the fuse.

Step 9. Testing the ammeter.
Check continuity between points 12 and 13…replace ammeter if there is no continuity or measurable resistance.
Step 10. Testing the capacitor.
Good Capacitor
The ohmmeter is first set to read resistance (in ohms) and the capacitor leads are disconnected from the transformer. In a good capacitor, when the ohmmeter leads are connected to the capacitor terminals (4 and 5), the meter needle jumps to the middle of the scale and rapidly moves to higher resistance.
Open Capacitor
When the ohmmeter leads are connected to the terminals, the meter needle stays at a high resistance. If the capacitor has failed “Open”, there may be a visible bulge on the top.
Shorted Capacitor
When the leads are connected to the capacitor terminals, the meter needle jumps immediately to zero ohms and remains there.
Step 11. Test the diodes.
Diodes are a one-way gate and will pass dc voltage in one direction. Connect your continuity tester leads on 1 and 3 shown in the illustration above…then reverse the leads. You should get continuity one way but not the other. Repeat this procedure on 2 and 3.
Step 12. Test all transformer windings.
Following the schematic for your particular battery charger, use your multimeter to ensure there are no open windings on the primary and secondary sides. In the illustration above, the primary winding is the two white/tan leads, while the secondary windings are the tan leads.
Final Notes
Automatic Battery Charger
With an automatic battery charger, the batteries must be hooked up before the charger will even turn on. allow 3 to 4 seconds for the time delay And if there is no click and a transformer hum, then we need to make sure that there is a proper connection between the battery charger and the batteries.
Check the plug-in receptacle public art on the cart for corrosion or dirt and if it’s in doubt, clean it and try again.


